Practical, step-by-step instructions for the most common things you'll do in DevBox Pro.
Laravel is one of the most popular PHP frameworks. Here's how to set one up.
Open Binary Manager and ensure you have at least one PHP version (8.2 or higher recommended) and Composer downloaded.
On the Dashboard, click the "+ New Project" button. In the dialog:
mylaravel.test)DevBox Pro will automatically run Composer to install Laravel, generate your app key, install npm dependencies, and create a database. You'll see real-time progress.
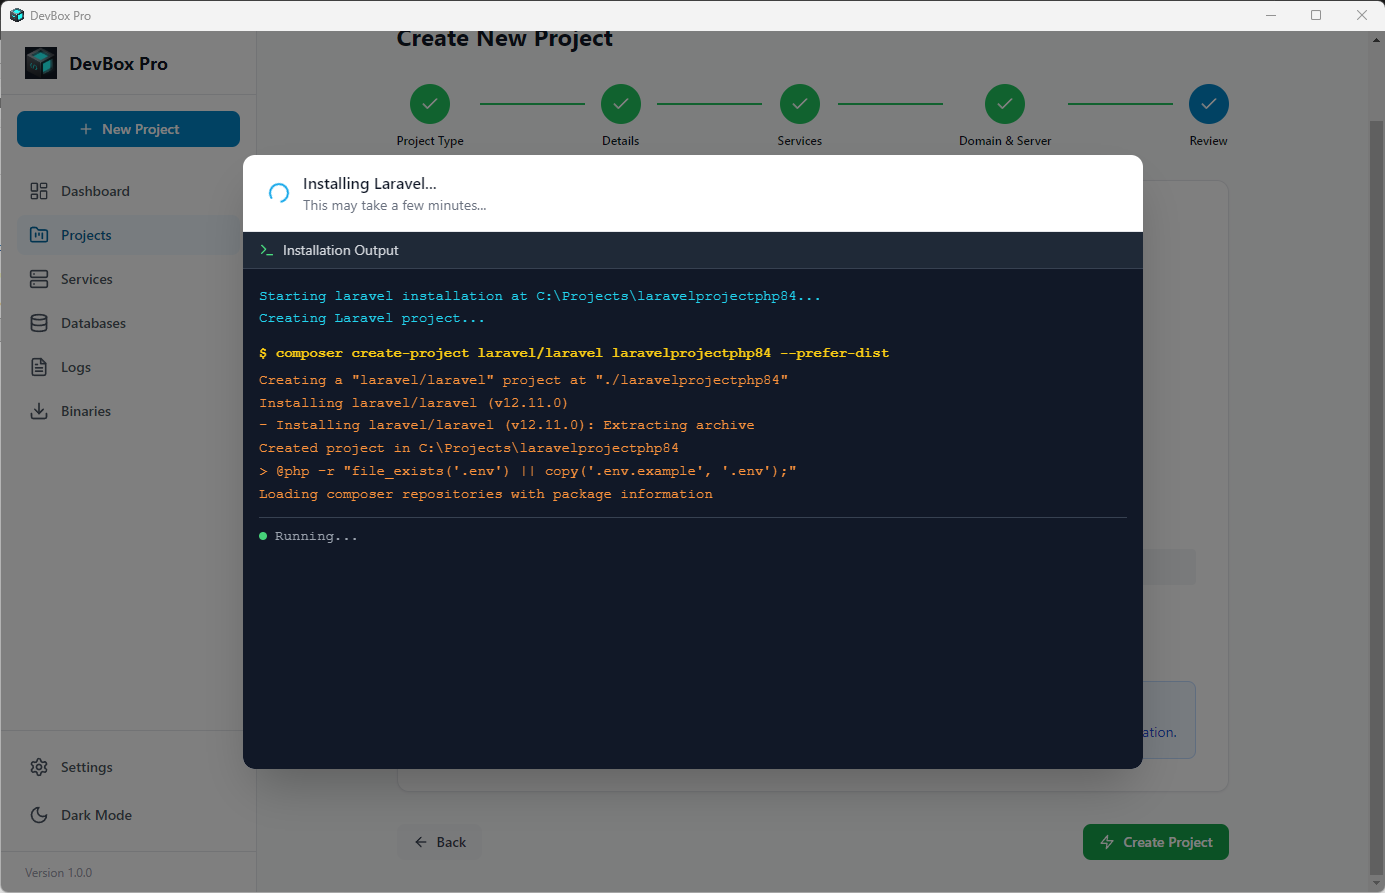
Click "Start" on the project card, then open https://mylaravel.test in your browser. You should see the Laravel welcome page!
Create a local WordPress site for development and testing.
Click "+ New Project" and set the type to "WordPress". Choose PHP 8.2 or 8.3 (WordPress works best with these). Enable MySQL and set your domain (e.g., myblog.test).
DevBox Pro downloads the latest WordPress automatically and creates your database.
Start the project, then open https://myblog.test. WordPress will show its famous 5-minute installation wizard. Fill in your site title, username, and password.
Your WordPress admin panel is at https://myblog.test/wp-admin. Install themes, add plugins, and customize your site — all running locally on your computer.
Set up an Express, Next.js, or any Node.js application.
Open Binary Manager and download the Node.js version you want (Node.js 24 LTS is recommended).
Click "+ New Project" and set the type to "Node.js". Choose your Node.js version and domain. DevBox Pro will configure Nginx to reverse proxy requests to your Node.js app.
Use the built-in terminal or any external terminal to run your app's start command (e.g., npm run dev). Visit https://myapp.test to see it in action.
Tip: When you create a Node.js project, DevBox Pro sets up the reverse proxy automatically so your Node.js app is accessible via a .test domain — just like PHP projects.
Create, import, export, and browse your databases.
Go to the Databases page in the sidebar. Click "+ Create Database", enter a name, and choose which database server to use (MySQL, MariaDB, or PostgreSQL). The database is created instantly.
If you have an existing database backup (a .sql or .sql.gz file), click the import button next to a database. Choose your file and DevBox Pro will import it with a progress bar for large files.
Click the export button next to any database to download a backup. You can choose to compress it as a .gz file to save space.
For a visual way to browse tables and run queries, start phpMyAdmin from the Services panel. It will open in your browser at http://localhost:8080. Log in with username root and no password.
Get secure HTTPS working for your local projects.
When you create a project, DevBox Pro automatically generates an SSL certificate for your .test domain. No action needed from you.
The first time you use HTTPS, your browser may show a security warning because the certificate is self-signed (generated on your computer, not by a company like Let's Encrypt). To fix this:
After this, all your .test domains will show a green padlock — no more warnings!
Run PHP, npm, and database commands from any terminal.
Go to Settings → CLI Tool in DevBox Pro and toggle on "Terminal commands".
Close and reopen your terminal (VS Code, PowerShell, or Windows Terminal) so it picks up the new commands.
Use cd to enter a project folder, then use commands as normal:
DevBox Pro automatically detects your project and uses the correct PHP/Node.js version.
Let others on your Wi-Fi network see your project.
This is useful for testing your website on a phone, tablet, or another computer connected to the same network (Wi-Fi).
Open your project in DevBox Pro and toggle on "Share on Local Network".
DevBox Pro will display your computer's IP address (something like 192.168.1.100).
On your phone or another computer, open a browser and go to http://192.168.1.100 (using the IP shown in DevBox Pro). You'll see your project!
Note: Windows Firewall may block incoming connections. If the other device can't connect, check that DevBox Pro is allowed through the firewall.
Bring your existing codebase into DevBox Pro.
If you already have a project directory, you don't need to create a new project. You can import it directly.
On the Dashboard or Projects tab, click the "Import" option next to the New Project button.
Choose the directory where your existing project is located. DevBox Pro will auto-detect the project type (Laravel, Node.js, etc.).
Set your desired PHP/Node.js version, assign a .test domain, and enable any databases you need. Click Import, and your project is ready to go!
Explore the features inside the Project Details page.
When you click on a project card from the Dashboard or Projects list, you'll enter the Project Details page. This page gives you granular control over the project through several tabs:
The central command center for your project:
Share on Local Network to test your app from your phone.
A fully featured, built-in command line interface that automatically opens in your project's folder. Run npm install, composer update, or php artisan commands directly inside DevBox Pro without opening a separate terminal window.
View real-time, consolidated logs for the project. Includes access logs, error logs, and output from any running Node.js process. You can toggle auto-refresh to watch logs stream in live as you develop.
Manage background processes using the built-in Supervisor integration. Add persistent background workers like Laravel Queue workers, Horizon, or any custom long-running scripts (e.g., php artisan queue:work). Set them to auto-restart if they crash.
A built-in editor for your project's .env file. Easily update connection strings, api keys, and environment variables without needing to open your code editor.
Complete guide to DevBox Pro's preferences and configuration.
DevBox Pro is highly customizable. The Settings page is divided into 5 major tabs:
.test or .local.php, npm, node, composer, and mysql directly from any external terminal. DevBox Pro natively intercepts these and routes them to the correct local version based on what folder you are in.